This is Join 12 from my joining stitch sampler. It came from YouTube:
73-Joining two cloth pieces in decorative manner(Hindi/Urdu)
The video is hard to follow, so I took step-by-step photos to help me remember the stitch without rewatching. This stitch is quick and easy, thus the nickname “baby randa.” It makes a narrow join that folds easily and looks good on both sides.
Step-by-step.
Steps 1-3 are to get started. Thereafter repeat steps 4-6 until complete.
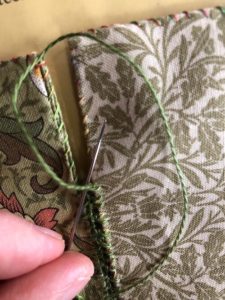
1) Start with thread anchored in Side A, a slight distance from the edge.
2) Insert needle into Side B from above. (Try to maintain the same distance from the edge throughout.) Wrap thread over needle. Pull through gently to form a knot at the edge of Side B.
3) Insert needle under the thread bridge between the two sides and come up through a loop of thread. Needle does not pass through any fabric. Pull gently to form a knot in the gap.
4) Insert needle into Side A from above. Wrap thread over needle. Pull through gently to form a knot at the edge of Side A.

5) Insert needle into Side B from above. Wrap thread over needle. Pull through gently to form a knot at the edge of Side B.

6) Insert needle under the thread bridge between the two sides and come up through a loop of thread. Needle does not pass through any fabric. Pull gently to form a knot in the gap.
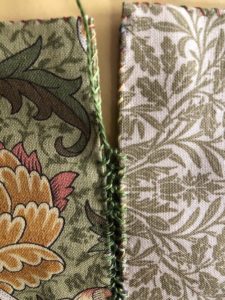
Join looks like this as it builds.
Additional tips:
Pierce through the entire panel of fabric to ensure the stitches show on both sides. Don’t just skim through upper layer.
Try to use one length of thread for the whole join. It’s possible to start again with a new piece of thread but it introduces a little variation in the uniform look.
The repetitive stitching abrades the thread, so try not to exert too much force on the thread when pulling it through.
I like the look when the stitches are packed more closely together. The video shows them more stretched out.